Monday, October 17, 2011

Welding Random Holes


I spent this weekend going through the body and welding up some of the random holes in the Jeep. I found out that the previous owner had decided at some point to replace a few parts on the Jeep including the door hinges, windshield, and a few minor parts. When they installed the hinges and windshield, they used parts from a Pre-1975 Jeep. Anybody who knows Jeeps knows that those parts changes in 1976 and while they may "work" they will require some extra holes drilled in the body.  


 This picture is actually for another post I will be writing about about body repair, but I could not find any other before shots of the "wrong hinge". This is an example of the Pre-1975 hinge which takes four bolts . If you look at pictures of a 1976 and later hinge, it only has two holes. Funny thing, the body of this Jeep was already drilled out for the correct hinge and had body plugs in them. For some reason, the previous owner felt it necessary to drill more holes.


After taking out the bolts, I grabbed the welder and filled in the four holes. It was pretty easy and went really fast. The one thing I did have to watch for was the overall temperature of the body. If I welded all the holes one after another, the sheet metal temperature would have risen to a point that it would have warped. So I started at the bottom of the hole, filled it in vertically from bottom to top and let it cool. No warping here! After some grinding and sanding you may ask yourself, what holes?? Notice the two holes I did leave, those are the stock drilled holes for the correct hinges.  

Till Next time....

Monday, October 10, 2011

Rattle can RED has to GO!

Today I attempted to sand, chemically remove, scrape, grind and any other method you could possibly try to remove the nasty rattle can red paint on the Jeep. After attempting to sand with a harsh 4 1/2" grinder sanding pad made to remove paint I noticed all it is doing is creating enough heat to melt the paint and spread it instead of sanding it off. My best guess is this is due to the type of paint, Krylon rattle can.
This wheel worked alright on actual car paint, as for the rattle can red, it just melted the paint and the paint ended up in the deep sanding scratched making it harder to get out. My suggestion is leave this at the store! I used a few different types of grinder wheels to take the paint off but none of them are designed to be used on the entire project.
 The wheel above was best for sanding metal like welds and after grinding an area down. It also quickly took the paint off in preparation for welding. Just like the other sanding wheel, if you use it too much it just heats and smears the red paint.
 I used this wheel to get all the paint off in the tight areas like around the Jeep logo stamped on the side of the Jeep. I also used it to clean up minor splatter from welds.
This wheel worked GREAT in tight corners of the Jeep. I used it on all the body lines and along the top rails of the tub. The only draw back to this wheel is it will take any paint on the Jeep down to metal quick. So if you are not planning on going that deep, I advise you stick with hand sanding tight corners. 

Below is the attempt at chemically removing the paint from the hood. I tried it with the hood first because it was already removed from the Jeep and I could work on it outside. Needless to say, it was very messy, smelly, I constantly had to wash my hands and arms because the spray mist would get on my arms. After I scrapped a majority of it off, I busted out the sander and finished it up. 

 Here is a video of the paint peeling off with the stripper, it was pretty cool looking.
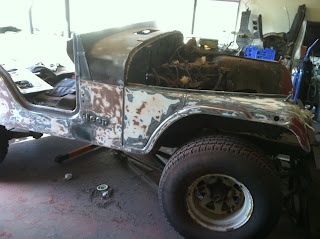
Here are some pictures of the Jeep after sanding down one side smooth enough for primer. There were at least 6 coats of paint on this tub. While all the other colors seemed to be true automotive grade paint, the red was not. My main focus on sanding was all the red had to go and the rest had to be smoothed out. I have a little bit more to go on the rear end and then its time for minor bondo body work and primer. 


Wednesday, October 5, 2011

Top Cowl Removal

The first thing on my agenda for the Jeep is the body work. I want to get this thing all painted up, drop the engine in and go driving. I figure if I am going to go through the effort of getting it painted, I want the body to be perfect. There were only three spots of rust on the entire Jeep and they are not all that bad to begin with. The first step was to get the old top cowl off and replace it with a new one. I had no clue how to get it off so I had a buddy of mine who used to work in a body shop come analyze the situation with me. We found all the spot welds and figured after drilling them out it should pop right off. Below is the damage to the top cowl. It has the same rust damage on both sides of the Jeep.

Finding the spot welds proved time consuming as it seems someone at some point in time decided to put some type of filler on top of the spot welds. I was able to use a 4 1/2" wire wheel on my grinder and get the goop out of the way. Below is a picture of the channel just forward of the hood hinges. Note the two layers of metal, one creating a C channel and the other on top in the shape of an L. It is the top skin that I need to get off. I will do so by drilling those dents you see in the center of the channel which are spot welds. There are two schools of thought in order to drill out the spot welds. One is to take a drill bit about the size of the weld and drill through it. This would leave you with a hole in the second piece that you are not wanting to remove. While you can weld the holes back up (I did this and will show pictures later) you can also use a drill bit a little bit bigger and try to drill away the top weld while not going through the second layer. This proves a bit more time consuming, but easier to back fill with the welder later.
With the spot welds drilled out (I used both methods, some by choice and some by accident) the cowl is about off. There were spot welds along the channel I showed above, on the top section where the windshield seal goes, and along the internal frame behind the dash. After attempting to get it off, I find a few welds I missed.Soon after, the top cowl is now off. 


Above is the process of drilling and peeling the parts back to loosen it from the internal frame. I was careful not to pry on the frame too hard and I will need it straight to secure the new top cowl on. Now if I can only get JeepHut.com to answer my phone calls or emails and let me know where my top cowl is, I could get to work on putting it in!


 Before I do put it in though, I have gone though and filled in all the holes with a welder, and ground them smooth. I have also sanded all the rust off and painted the areas that I will not be welding when I install the new top cowl. Below is some pictures of the welding process and the finished product. The Jeep is now completely prepped for the install of the new tops cowl, as soon as it comes in, we will dry fit it and then tack weld it in place.

The Start......

Today I am starting a Jeep project on a 1981 Jeep CJ 5. This was somebody's Jeep project that they carted around with the for 16 years while being in the Navy. Another couple bought the Jeep thinking they would be able to get it back up and going for a hunting Jeep. Well we know how that went considering it has now made it into my garage!


The Jeep is in pretty good shape and for the most part its all here. My plans with the Jeep is to get is in like new condition for my wife to drive as a daily driver. After that I will continue with modifications to make it trail worthy while still being street legal and enjoyable. After all, one of the wife's requests is A/C????? Either way, there is a lot of work to do. For all you Jeep enthusiasts, I will be posting pictures of this Jeep coming back to life. The first project: Rust Removal